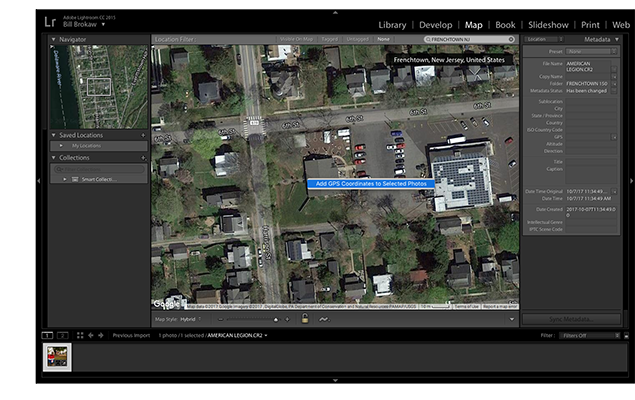
These are the steps for processing your photos in Lightroom. See “GEOTAGGING ONLINE” post if you do not use Lightroom.
You need to:
CROP YOUR PHOTO SQUARE
GEOTAG IT
NAME IT “LOCATION – PHOTOGRAPHER.jpg”
RESIZE IT TO 1200×1200 pixels
LABEL “LOCATION – PHOTOGRAPHER.”
SUBMIT IT
The video at the bottom of this post illustrates the steps itemized below.
- Import the best, most representative photo of your location into Lightroom and then select it to make it active.
- Switch to the “DEVELOP” mode to enhance your image and to crop it.
- Select the crop tool and using the “Aspect Ratio” pulldown menu, crop your photo 1×1 ratio. You made have to hit the little lock icon to unlock your photo and allow the square cropping.
- With your photo still selected, switch to the “MAP” mode and search for Frenchtown NJ.
- Zoom and pan the map until you find the location you photographed. When you find your location, right click on the map to get the coordinates (latitude/longitude).
PLEASE NOTE! You want to get the coordinates of the location you photographed, not the location where you were standing when you took the photo. (If your camera has GPS it may have already assigned coordinates your your file which must be over-written because these would be the coordinates of the camera rather than the coordinates of the location photographed.) - After assigning coordinates, switch to the “LIBRARY” mode and click the Export button.[Steps 7 through 9, below (File Naming, Sizing and Labeling) can also be done outside of Lightroom using other software tools.]
- Use the File Naming function to name your file “LOCATION – PHOTOGRAPHER.” (Note this can also be done after exporting using any file naming function on your computer.)
- Use the Image Sizing function to make your file 1200 pixels x 1200 pixels @ 200 dpi.
- Use the Watermark function to label your photo the same way you named your file, “LOCATION – PHOTOGRAPHER.”
- Email me your file. Bill@BrokawPhoto.com

